This workflow applies to all COVID Rent Relief projects.
TABLE OF CONTENTS
- Eligibility
- Entry
- Service Transactions
- Exit
- Correcting Mistakes
- Reports
- Canned Reports
- Admin Reports
- DQ for Basic Entry Assessment – run this report to find errors in project entries and break them down by user
- ERA DQ for Service Transactions (previously called Service Transaction History) – run this report to find any transactions that do not have a funding source, vendor, or notes
- ERA Payment and Demographic data - run this report to make sure your payment data is reporting accurately
- FundManager (Admins Only)
Eligibility
Before you enter a client into your project, you must make sure they are eligible for rent assistance.
- Make sure that their living situation meets the eligibility requirements for Homeless Prevention (HP). You can use the Living Situations Crosswalk to help you. All clients must be in a rental, or a hotel or motel without emergency shelter voucher if they are in a long-term stay.
Check the WellSky profile for all adults in the household to make sure that they are eligible.
- An open enrollment in RRH, PSH, PH, TH, or any open shelter stay usually means they are ineligible for assistance. Look at the last several pages of entries on the entry/exit tab to make sure the client does not have any open entries in these projects.
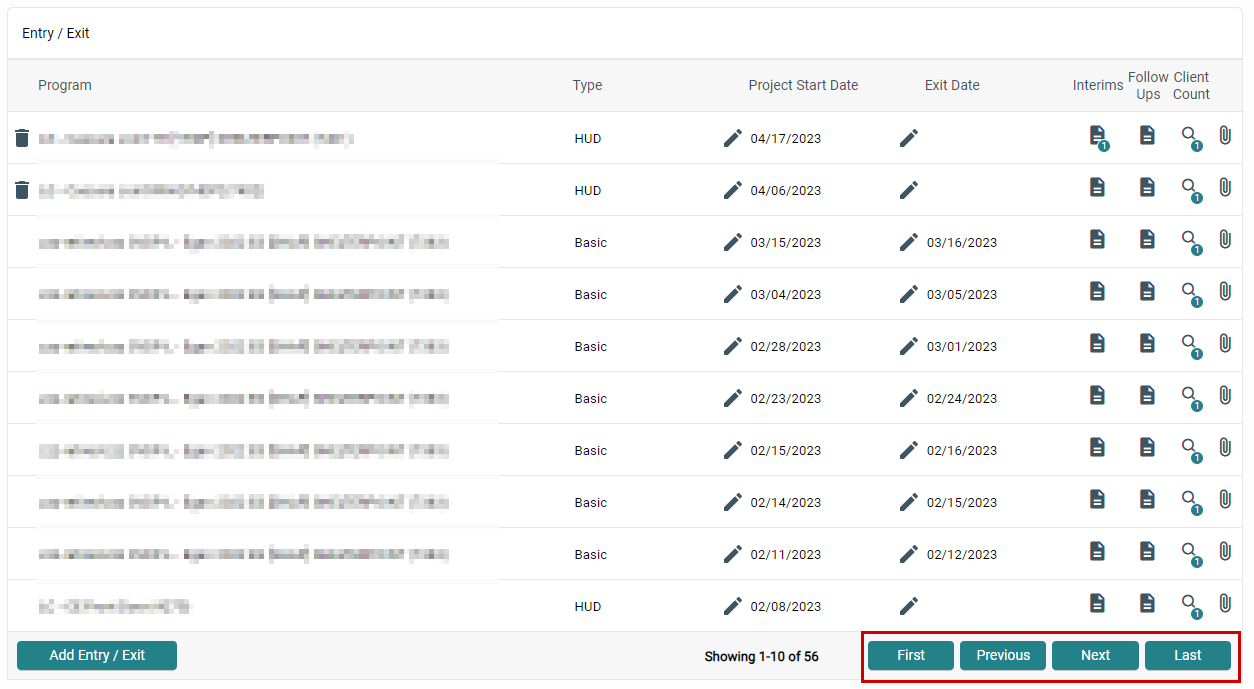
- Look at the client’s service transactions (click the pencil icon and read the service notes) to make sure they are not already receiving assistance from another agency. Remember to look at all months that a client is requesting arrears for. If a client received rent assistance through any HP or other rent relief projects like STARR or ERRLC you must look at the notes for each transaction to see what months they received assistance for. The date of the service transactions may not be the same as what appears in the notes, especially if arrearages have been paid
- Assistance cap: Remember that the number of months of arrears + current + future rent paid by ERRLC cannot exceed 15 months. For LCERA, it cannot exceed 18 months.
Entry
Entry into your project will follow a typical ClientPoint workflow. Each step is included here with reminders about common errors.
- Profile – make sure that the client profile matches the information provided on your application. Update veteran status and SSN if needed
- Household – make sure all clients on the application are listed as Household members (adults and children) and add any who are missing. Please do not delete any household members, and do not create a new household unless there are multiple clients on your application and no household exists.
- ROI – this should be in place for all clients.
- Add new Entry – make sure everyone who is going to be receiving services is selected. When you create the entry – especially if you are in back date mode – pay attention to the time and date of the entry. All service transactions must occur after this entry time and date.
- Household data sharing – if there are multiple household members on the entry, click Add Household Data at the top and fill out the questions that appear. This will populate these fields in each person’s entry assessment so you only have to answer them once.
- Client Contact Info - this is required for the Head of Household – the physical address must be the address of the unit you are providing rental assistance for. If there are any older contact info records, make sure to end date the older contact info records so they do not overlap with each other
- Entry assessment questions – just because there are some questions already filled out on the assessment, it doesn’t mean those answers are still correct! You must ask and update the answers to every question on the assessment. These questions are most commonly missed:
- Relationship to head of household – each household must have one person marked as Self (Head of Household) and not more than one. The person who applied for assistance is usually the head of household.
- Client contact information – every head of household needs to have this added, even if the information has been updated in the last six months. The physical address must be the address of the unit you are providing assistance for. All previous client contact information must be end dated. If possible, make sure that the contact records do not overlap.
- Prior living situation – aka “Where did you stay last night?” This is how we determine whether the client is eligible for the project. For this project type, all clients should be entering your project from a rental or hotel/motel without voucher.
Service Transactions
Each component of a service transaction is listed here with instructions specific to each service type. Before you get started, remember:
- All transactions must be created from the head of household's profile. This will mark the head of household as the Primary Client on each transaction.
- Include all household members from the entry on each service transaction.
- Make sure that the months you are paying rent for are eligible under your program’s requirements and that the months of rent have not already been paid by another project.
- The start date and time of every transaction must occur after the entry date and time. The end date and time of every transaction must occur before the exit date and time. If the date and time of a transaction does not sit in between the entry and exit, it will not be counted.
Create a transaction for each month of rent and each month of utilities. Arrearage months should be grouped together in one transaction. Make sure each field is filled out:
- Service Provider – this is always the same as the project on your entry
- Start/End Date and Service Type – arrearages and payments are all the same Service Type: Rent Payment Assistance or Utility Service Payment Assistance. How you enter the Start and End Date depends on what type of payment you are providing.
Arrears
- Any rent payments that are made after the 5th of that month count as arrears. Arrears should all be grouped into one transaction. The start and end date are the same date, which is the date the payment is made.
- Ex: on March 8th you pay rent for January-March. This would be one service transaction of arrearages with Jan-Mar rent all added up together. The start and end date of the transaction would be 3/8.
- Ex: on March 3rd you pay rent for January-March. January and February rent would be one service transaction of arrearages with Jan-Feb rent added together. The start and end date would be 3/3. March rent would be recorded according to the instructions for rent payment transactions.
- Any rent payments that are made after the 5th of that month count as arrears. Arrears should all be grouped into one transaction. The start and end date are the same date, which is the date the payment is made.
Current or Future Months
- Any rent payments made before the 5th of the month it is due are not arrearages. Each month must be its own service transaction. The start date of the transaction will be the first of the month OR the date of the entry, whichever date is later. Make sure the start time and date of your transaction is after the entry time and date. The end date is the last day of the month. The end time and date must be before the exit time and date.
- Ex: a client has an entry for your project on June 2nd at 10am and you pay rent for that month and three months forward. The start date for your June rent payment would be June 2nd and the time needs to be any time after 10am. The end date of the June transaction would be 6/30. July-September rent payments would be 3 separate rent payment transactions, each starting on the first date of the month and ending the last date of the month. You would need to make sure the time of the September transaction comes before the project exit date and time.
- Motel payments – use the same instructions as rent payment, but make sure the service type is Motel Bill Payment Assistance
- Any rent payments made before the 5th of the month it is due are not arrearages. Each month must be its own service transaction. The start date of the transaction will be the first of the month OR the date of the entry, whichever date is later. Make sure the start time and date of your transaction is after the entry time and date. The end date is the last day of the month. The end time and date must be before the exit time and date.
- Service Notes – include all months the transaction paid for and any other relevant notes
- Number of units – this is the number of months that was paid for by the transaction. Ex: arrearages for January-March would be 3 units
- Unit Type – arrearages are Month(s) Rent Arrearage(s). Current or forward rent is Rent Payment.
- Cost per Unit/Total Cost of Units – please do not fill out these fields.

- Apply Funds for Service – click the chevron to expand this section and fill out all required fields
- Vendor – all transactions must have a vendor attached. Please search and make sure the vendor does not already exist in the system before adding a new vendor (only admins or the LC HelpDesk can create a new vendor). If making a direct payment to a tenant, you can leave the vendor blank but please put that this was a direct payment in the Service Notes.
- Client Co-Pay – this must be filled out any time a client is receiving a subsidy instead of a full payment
- Add Funding Source – a funding source must be added to all transactions and the $ amount must be entered.
Click the photo to zoom in
Exit
Remember to exit all household members in the exit. Clients should be exited after their last service transaction, and the exit date and time should be after the date and time of the last service transaction. If you paid rent for one month in the future, you should create the exit for the last day of that month.
The Reason for Leaving and Destination must be completed. The Destination should be the same as the Prior Living Situation on the entry.

Correcting Mistakes
When you come across mistakes, please correct them as soon as possible. You should be running reports at least weekly and correcting these mistakes. Email the Help Desk if you need help figuring out how to correct these errors.
- Entry errors – pencil edit the entry to fix any entry errors
- If the entry needs to be deleted, go to the entry/exit tab and click the trash can next to the entry. You must go to the profile for each client on the entry and repeat this process. Unchecking the box next to the name of a household member does not remove them from the entry.
- Service transaction errors – you can pencil edit the transaction to correct errors such as service and unit type.
- If the error is related to the fund or $ amount, you must void and delete the service transaction and create a new one.
- Deleting a service transaction will only delete for that individual client. Service transactions must be deleted from the service history of every client on the transaction.
- Primary client errors - Delete the transaction for the household member who is erroneously marked as Primary Client. Then view the transaction from the Head of Household's profile and make sure they are now marked as the Primary Client. If not, continue deleting the transaction for household members marked as Primary Client until the right person is marked as Primary Client. Once the Head of Household is marked as Primary Client, edit the transaction and click the button that says "Include Additional Household Members". Check the box next to each client who needs to be added back in and click Save & Exit.
- Exit errors – pencil edit the exit to fix any exit errors.
Reports
Different reports are recommended based on your level of user access. Canned reports are accessible to all WellSky users, regardless of license type. It is recommended that users run these reports regularly to check for errors in their clients’ records. Admin reports are available to agency admins and other users with an ART license. It is expected that admins run these reports at least weekly to find errors and notify relevant staff who will be making the corrections.
Canned Reports
All users have access to run some data quality reports at a project level. Because these reports are only at the project level, you may see errors that you did not make. It may not be your responsibility to reduce the number of errors to 0, but you should do your best to identify any errors you made and correct them.
ESG CAPER – run this report to check for errors in your project entries and exits. If you choose to run the DQ report (listed in Admin Reports) for entries, you should still run this occasionally to check for Relationship to Head of Household, Disabling Condition, and Prior Living Situation/Exit Destination errors.
- Click on Reports in the left menu

- Select the ESG CAPER 2019
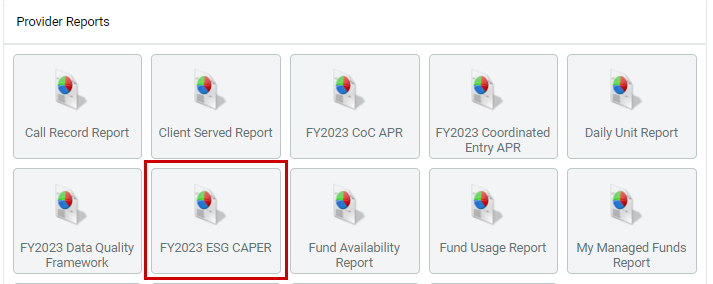
- Click Search to find your project and set it as the provider
- Make your Program Date Range the dates you want to include in the report. If the entry is open at any point in your date range, it will pull into this report.
- Ex: Run from [first date of program] to [today] to see all entries, [first day of the month] to [today] to see entries for any clients who have been in the project at any point this month, or [today] to [today] to see entries for all clients currently enrolled
- Select your Entry/Exit Type (HUD) and click Build Report

- When the report is complete, it will appear in the Report Run History at the top of your screen. Click the magnifying glass to view the report, which will load beneath the report prompts.

- You will need to review Sections 6a-6b for errors. If there is an error in the section, you will see a highlighted number. Click on the number to view all client names and IDs who have the error. You can then search for them in ClientPoint, pencil edit their entry, and fix the error. The CAPER guide explains each error in more detail.

- You should also review sections 15 and 23c for the living situation in the entry and exit. This must match the eligibility requirements for the project. This report should only have clients with a Rental as their Living Situation, and all clients should have a Rental as their Exit destination.
Client Served – run this report to see if there are any service transactions that do not have a fund attached
- Click on Reports in the left menu
- Select the Client Served Report
- Click Search to find your project and set it as the provider
- Make your Served Date Range the first date of your project to the last date you may have paid rent to pull in all services. Then click Build Report
- The report will load at the bottom of the screen. Scroll all the way to the bottom to view the Service Count. All of your services should have a Funding Source attached. If any show N/A as the Funding Source, your agency admin can run a Service Transaction History report to find the transactions.

Admin Reports
Users with a Business Objects license have access to reports that other users do not. It is important that you run these reports weekly and inform your staff of errors so they can be corrected. Errors must be corrected in a timely manner. Please email the Help Desk if you need assistance running or interpreting these reports.
DQ for Basic Entry Assessment – run this report to find errors in project entries and break them down by user
- Click on Connect to BusinessObjects in the top right corner of the screen
- Open the Lane County Live Folder and the Data Quality sub-folder
- Choose DQ for BASIC Entry Assessments v3.
- Select your rent assistance project(s) and the appropriate date range. Include services if you want to make sure that all clients with a project entry have at least one service transaction
- The Client Detail section of this report will show you all clients who had an entry in your project during the date range. Any client with gray text has an entry with no errors. A client with text in green and red has some errors, and the errors are the cells in red. The DQ guide will tell you what all of the columns mean. You can filter by the column that says “User Creating” to identify which of your staff created the error.
- Because all of these questions were required on the application, all red values need to be corrected
- SVS = No means that the client either has no service transactions, or their service transactions sit outside of the entry/exit
- Zip and Prior LOS can be ignored

ERA DQ for Service Transactions (previously called Service Transaction History) – run this report to find any transactions that do not have a funding source, vendor, or notes
- Click on Connect to Business Objects in the top right corner of the screen
- Open the Lane County Live Folder and Data Quality sub-folder
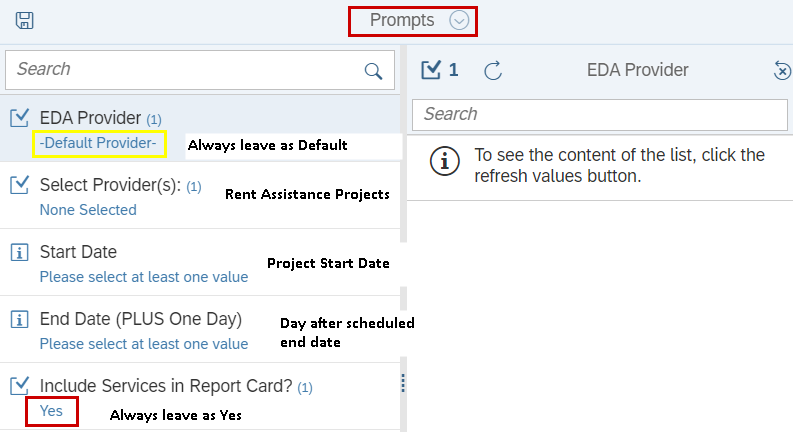
- Click on ERA DQ for Service Transactions [Provider]
- Select your project as the provider on the first page of prompts. Do not fill out the EDA Provider
- Click on the Months Rent tab
- This will show you how many months of ERA assistance the client has received. Make sure it does not exceed the maximum number of months.
- Click on the Not HoH tab
- This shows transactions where the person marked as the Primary Client is not marked as the Head of Household on the entry. You may have a head of household error on your entry, or you may need to correct who is marked as primary client on the transactions.
- Click on the Payment Detail tab
- All lines that are in bold are for the head of household. Every column needs to be filled out for this client. You can filter this report to just clients marked as Self (head of household) to review this information
- Check the service units, units, amount and notes to make sure that they match
- Rent Payment should always be a Unit of 1. Remember that current and/or future months of rent cannot be combined into one transaction
- If multiple months of rent are listed in the notes, there should be multiple units for Month(s) Rent Arrearages
- All service transactions must have a Vendor attached and have the months paid listed in the notes
FundManager (Admins Only)
Adding a Vendor
All service transactions must have a vendor attached. If the vendor does not already exist in WellSky, you will need to create them. Make sure you have the Tax ID of the vendor before starting this process.
- Click on FundManager in the left menu and then click on Vendor Admin

- Click on Vendor Admin and make sure they have not already been added
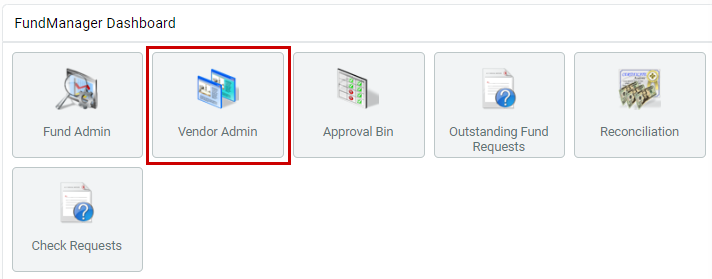
- If the vendor does not exist, click Add New Vendor

- Enter the Vendor Name and Tax ID and click Save
- Click Add Address and add the Vendor address.
Fund Usage Report
The Fund Usage Report is available to users who have access to FundManager. Use this report to reconcile your invoices with your entries. If your fund is not visible in the report, you will need to contact the Help Desk to have it added. Use this report to reconcile your records with what has been entered into WellSky transactions.
To access the Fund Usage Report, Click the FundManager or Reports tab in the left menu and then click on the report 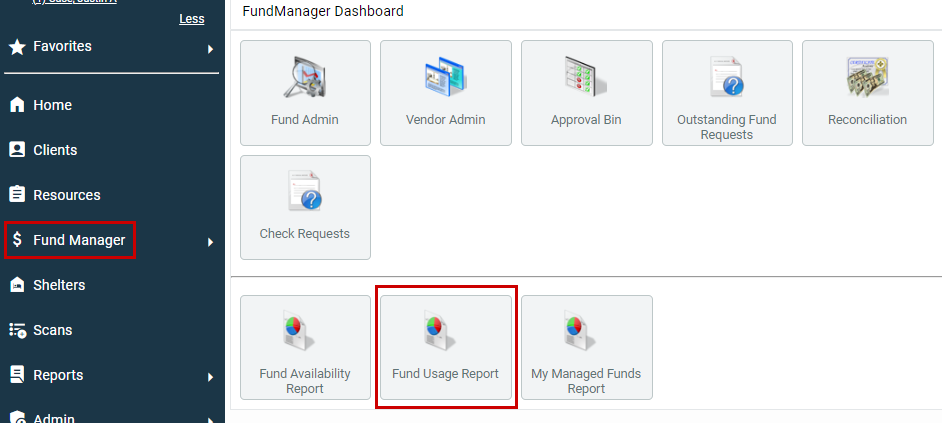
OR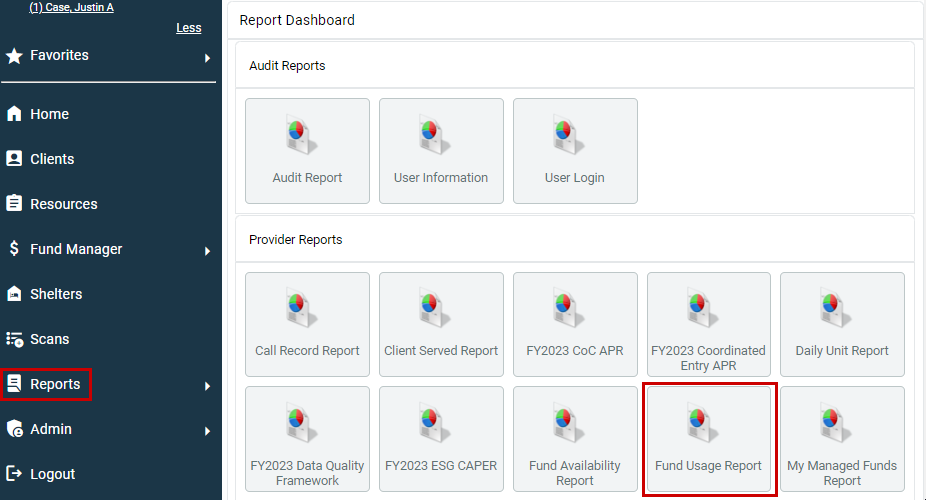
Then select the Fund (if the fund you would like to use is not in your dropdown, contact the Help Desk to have it added), Vendor (if you want to limit the report to a specific vendor), and Provider
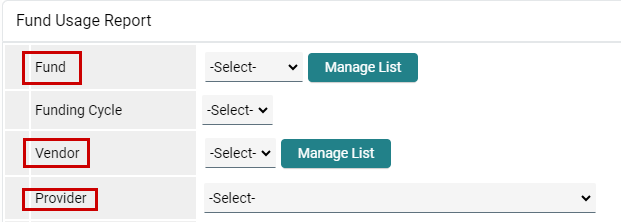
Your start and end date will be when the transactions were entered (ex: if you entered payments for January-March on December 15, they will only pull if your date range includes December 15).
Then select all columns that you want to appear in the report. We recommend all in the middle two rows. Make sure to select Last Action because this report will include transactions that have been Voided. When all prompts have been entered, click Build Report.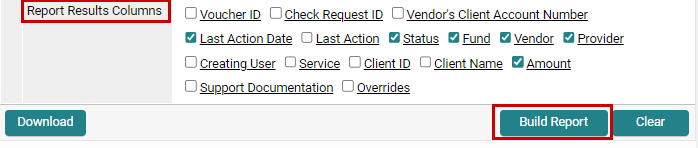
You can click Download to download the results, or view the report on the same screen. There will be a line for each transaction during the date range that has the fund attached. Click the magnifying glass to view details about the transaction.
Was this article helpful?
That’s Great!
Thank you for your feedback
Sorry! We couldn't be helpful
Thank you for your feedback
Feedback sent
We appreciate your effort and will try to fix the article