Joint TH/RRH projects are one program, but in HMIS, they are split into two projects. Please read these instructions carefully to understand when clients should be enrolled in these two projects.
TABLE OF CONTENTS
- Accepting the Referral
- RRH Enrollment
- TH Enrollment
- Documenting Client Move-in and Interim Reviews
- Annual Assessments
- Service Transactions
- TH Exit
- RRH Exit
- Joint TH/RRH Reports
- Documenting housing and household changes (FAQs)
Accepting the Referral
To find a list of Referrals to your project, see the instructions for the Referrals Report.
In the Clients Module:
- Review the Client’s record and determine eligibility.
- If there are multiple individuals in the household, confirm that all the household members are associated with the Head of Household in the Clients Module on the Households tab.

- Go to the Services Transactions tab.
- From the Dashboard, go to View Entire Service History

- Click on the Referrals tab

- From the Previous Referrals list, click on the pencil icon to begin processing the referral.

- From the Dashboard, go to View Entire Service History
If you are accepting this referral:
- Update the Referral Outcome to Accepted

- Change the Needs Status to “In Progress”

- Complete by clicking on Save Referral Information
- Proceed with the instructions for RRH Enrollment
If you are declining this referral:
- Update the Referral Outcome to Declined and list your reason

- Leave the needs status as “Identified”

- Complete by clicking on Save Referral Information

RRH Enrollment
All clients will be enrolled in the RRH project for the entire time you serve them, even if they only use the TH portion. Create an Entry on the Entry/Exit tab for your RRH project once you have accepted the referral. The Entry date for this client will be the date that you accepted the referral, and this will be the anniversary date for annual reviews.
When you are filling out the entry assessment, make sure the Housing Move-in Date is empty and the Prior Living Situation is the housing situation the client is entering the project from.
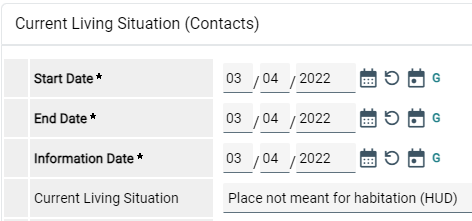
To record the Current Living Situation, Click Add at the bottom of the list

Start Date, End Date and Information Date will all be the same date. Then click Save at the bottom of the pop-up window.
All assessment questions should be completed or updated as of this entry date.
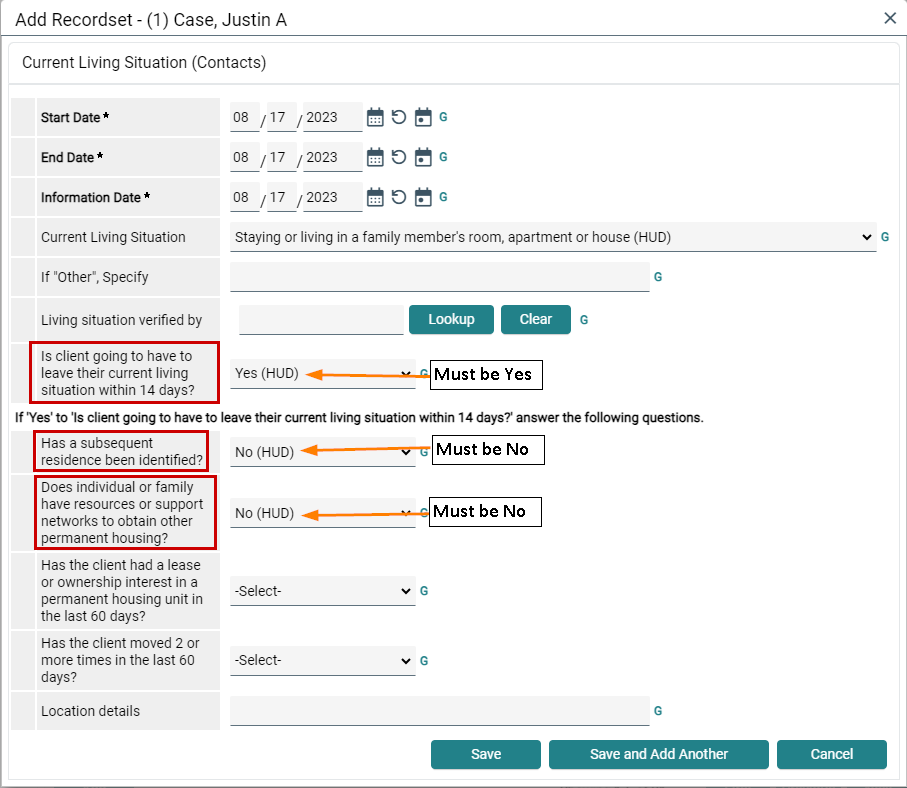
Important: Projects funded by the Youth Homelessness Demonstration Project (YHDP) can serve Category 2 (Imminent Risk of Homelessness). To capture that a Client is Category 2, choose the correct “Current Living Situation,” and you must answer questions in the following way:
- Start Date / End Date / Information Date: All the same – day you met with Client
- Current Living Situation: Can be a location that demonstrates imminent risk of homelessness (ex. Staying or living in a friend’s room)
- Is the client going to have to leave their current living situation within 14 days? Must answer Yes.
- Has a subsequent residence been identified? Must answer No.
- Does individual or family have resources or support networks to obtain other permanent housing? Must answer No.
TH Enrollment
Clients are only enrolled in your Transitional Housing project at times that they are staying in a TH unit. To enroll a client in this project:
Click on the Shelters Module in the menu on the left. Select your project as the Provider. Then select View All

This will show all of your available beds (Note: some projects have specific bed names, while others check all clients into Overflow). Click on the bed with a green plus sign to check your client into that bed. If your unit list needs to be changed or updated, please email the Help Desk and let us know what changes need to be made.

This will prompt you to search HMIS for the client, just like in the Client Module. Remember to always search for the client carefully and only create a new client if you cannot find a client record for them.
The next screen will show the Date In and Unit you are checking the client into. Remember to change the Date In if you are checking in the client for the previous day. If you accidentally checked the client into the wrong unit on the first screen, you can click Assign Unit to update it here.

You can scroll down to find the Household Members. Check the box next to each client who should be selected and click Assign Unit if they will be in a specific bed.

Make sure that a Release of Information is in place for the client

Then make sure your Provider is correct (it should not be your ADMIN project) and do not change the Type unless no assessment loads.

Continue scrolling to fill out the Entry Assessment. These assessment questions should be filled out for the head of household. Go to the Shelters Module Workflow to learn how to fill the assessment out for other household members, if there are any.
If the assessment has already loaded responses to some of the questions, remember that you will still need to review these questions and update the answers if they have changed. Make sure the Housing Move-in Date is empty and the Prior Living Situation is the housing situation the client is entering the project from. All assessment questions should be completed or updated as of this entry date.
You will then see the client(s) checked in on your Unit List.

Documenting Client Move-in and Interim Reviews
An interim review should be recorded on the client's RRH enrollment anytime there are changes to the client’s housing status or verification tables like income and insurance. See the Interim Reviews guide for instructions on how to record these.
To enter the housing move-in date, select Housing Move In Date as your Interim Review Type and click Save & Continue. Make sure to fill out the Housing Move-in Date for all household members and update any other questions that need updates. Remember that the HMID should be the date that the client actually started living in the unit, even if that comes after the start date on the lease. If the client is also enrolled in TH, the HMID must be on or after their check-out date from the TH project.
For all other updates except your annual review or, select Update for your Interim Review Type. Select Annual Assessment for an annual review (more instructions below).

Review all of the questions in the interim assessment and update any information that has changed. Make sure you complete the assessment for every household member. Then Save & Exit.
Annual Assessments
Annual assessments are entered by recording an Interim Review for the client. An Interim is due on the anniversary date of the project enrollment. If the client is enrolled in both TH and RRH, an assessment needs to be recorded for each project on the anniversary of that project's enrollment. Remember that for annual reviews, your review date should be the same date as the anniversary date, even if it is a slightly different date than when you collected the information.
For example: A client enters the RRH portion of your project on 11/3/2022, and the TH portion on 12/5/2022. Their annual assessment for RRH would be due on 11/3/2023, and the annual for TH would be due on 12/5/2023. If the client exits TH before 12/5/2023, an annual assessment would only be required for RRH.
Service Transactions
Full instructions on creating a rent or utility payment transaction are in the Rent Assistance Service Transactions guide. Before you get started, remember:
- All service transactions (case management, rent payments, deposits, etc.) must be for the RRH project. Do not record any service transactions under the TH Joint project.
- The client should have a project entry before you record any services.
- Include all household members from the entry on each service transaction.
- You should create the transaction from the profile of the head of household. This will automatically mark the head of household as the Primary Client for each transaction.
- The start date and time of every transaction must occur after the entry date and time. If an arrearage payment is recorded before the entry date and time, it will not be counted.
You may record other transactions like Case Management. These will have a Start and End date of the day the service was provided, and funds do not need to be attached.
TH Exit
A client should be exited from your TH project the day they are no longer staying in the TH unit. If they will be leaving your Joint TH/RRH project completely, you'll also want to exit them from RRH using the RRH Exit instructions in the next section. To exit the client from TH:
Click the bed icon to the left of the client you want to check out.

Make sure the Date Out is correct and that the Reason For Leaving and Destination are completed (If they are leaving because they are now housed in RRH, make sure to select Rental by client with RRH or equivalent subsidy as the destination). Remember to include other household members in the check-out if there are any.

Click Save & Exit. Then you will see that the client is no longer in your Unit List.
RRH Exit
Clients should be exited after your last service. This may be when they receive their last rent payment, or after the last service if you continue to provide case management. Exit the client from RRH on the Entry/Exit tab of their profile in the Clients Module. When you are ready to create an exit, click the pencil icon next to the empty exit date.

A pop-up window will appear that asks for some exit information. Make sure you select all household members who are exiting on this date.
- Exit Date - Please make sure the exit occurs after the last service transaction.
- Reason for Leaving - please be as accurate as possible and do not select any of the options that end with (HOPWA Only). If you select Other, please give more information in the field underneath
- Destination - see the Living Situations and Exit Destination Crosswalk if you are unsure what option to select. This can be entered based on client self report, or HMIS activity you see in the client's entry/exits. If you select Other, please give more information in the field underneath

When all questions are complete, click Save & Continue.
An exit assessment will then appear. Please fill out all assessment questions for the clients you are exiting. This information will be compared to the client's answers on their entry to evaluate project success.
Joint TH/RRH Reports
You should run the following reports at least once per month to make sure that your data is accurate and up-to-date.
- ESG CAPER or APR (WellSky) – look for errors on entry assessments in data quality sections 6a-6c, accurate prior living situations and exit destinations
- Data Completeness for YHDP Assessments (Business Objects) – look for missing information on entry assessment. You can run this less frequently if your CAPER is up to date.
- Annual Reviews (Business Objects) – find out which clients need an annual review recorded
- PSH and RRH Enrollments and Move-in dates (Business Objects) – make sure all housed clients have a housing move-in date. Look for any clients marked as unhoused in case their HMID was missed on an interim review
- Services DQ (Business Objects) – check service units, unit types, amount, and notes to make sure they all match. Make sure that all service transactions have a vendor attached (if the transaction was voided, it should be deleted). Look at the second page to find services outside the entry / exit dates, and services without a project entry.
Documenting housing and household changes (FAQs)
Client was housed but lost the housing
- Exit the client from your RRH project. Make the destination the living situation they exited to
- Create a new entry for your client on the same day as their exit. Make sure their prior living situation is the same living situation as it was on the exit.
- This client will have a new annual review date. Annuals will be completed on the anniversary of the new RRH project entry.
- If the client is staying in TH while you are helping them get into a new RRH unit, check them into TH on the day they start staying in a TH unit, and check them out of that TH unit when they are no longer staying in TH.
A new household member moved in after the entry
- Add this person to the RRH entry using the Client Joins Household after Entry Dateinstructions
- If checking into TH, click on one of the household members who is already checked in on your Unit List. Click the Check In Additional Household Members button.
 This will bring up a new window with a list of all household members that have not been checked in. Select the ones who are now checking in and make sure the Date In is accurate for these clients.
A household member moved out
- Exit the individual from your RRH project on the day they moved out
- Add an interim review for the same date and update the household size and any changes to household income
- If staying in TH, remember to check this client out of their TH bed on the date they left
A household member moved out but has moved back in
- Exit all remaining household members
- Create a new entry in your project with all household members who are now living together. Change the Housing Move-in Date to be this new entry date. Remember to update any household information (income, household size, etc) that has changed.
- This household will have a new annual review date. Annuals will be completed on the anniversary of the new project entry.
Was this article helpful?
That’s Great!
Thank you for your feedback
Sorry! We couldn't be helpful
Thank you for your feedback
Feedback sent
We appreciate your effort and will try to fix the article